A bit over a year ago I posted a YouTube video review of the T-Rex 2+ 3D printer that included a handful of modifications I had made to it. But then, recently, I was made aware of an official upgrade kit to turn the v2+ I had into a v3.0. Some of my mods even seemed to provide a little inspiration for the v3.0 :) So I got the kit and got to work installing it.
Note: this is not a review of the upgrade kit or the printer as a whole. This post is entirely intended for those that already have the T-Rex 2+ or 3.0 and are looking to improve it with further mods that I created. Also, all modifications are made at your own risk.
Upgrade Kit
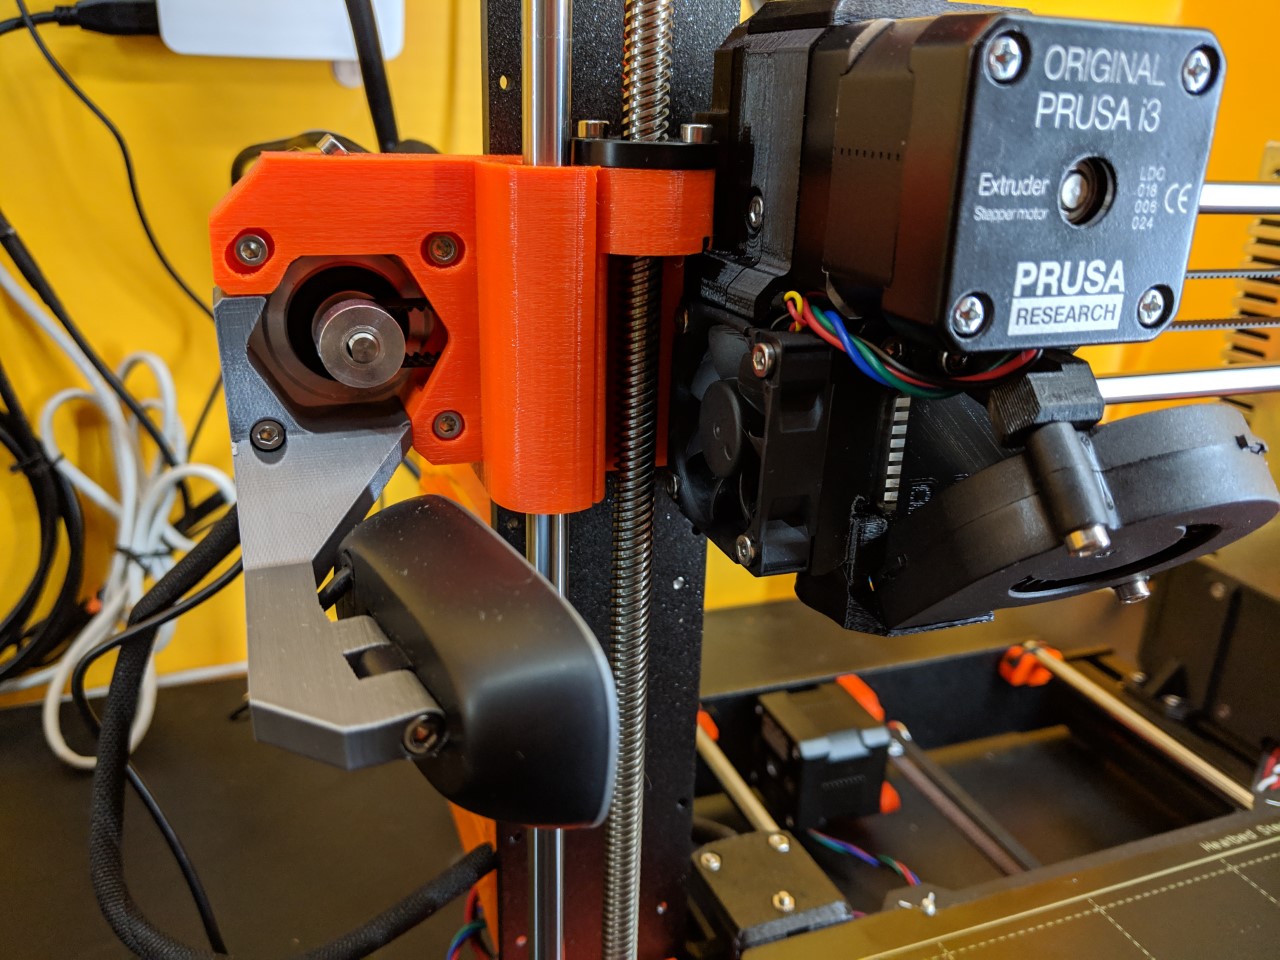
The 2+ to 3.0 kit does what it says on the tin and breathes some new life into the printer. Probably the most welcome upgrade was an all new controller board with Trinamic drivers that make for a much quieter printer. Aside from some of the most lacking instructions I’ve ever seen, the one problem I’ll give some focus to is the X-Axis motor covers.
I’ll be blunt… the right cover provided did not fit at all.
Yes, it came that way. After much discussion with Formbot support I was left with: “The covers may not fit all printers because they have ‘tolerances’”. Ummm… ok. That’s just some terrible engineering then. I fail to see how there could be such loose tolerances with all the printers or just so many variations of the 2+ and 3.0 that a single cover design wouldn’t fit them all. So, instead of loosing sleep over that insanity I decided to take it as an opportunity to improve those parts while fixing them. (Their solution was to take a Dremel to the provided cover)
New Motor Covers
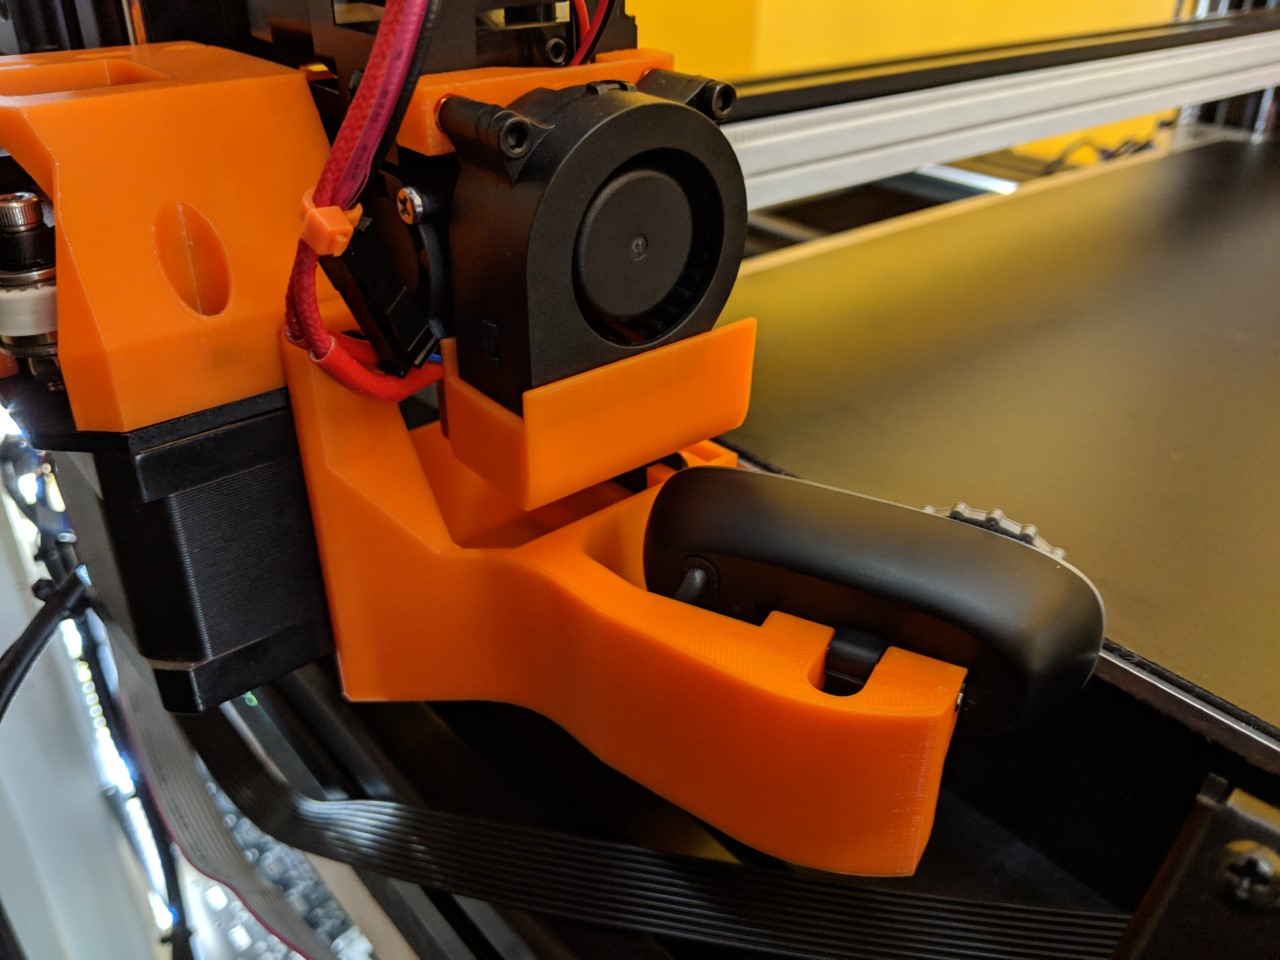
Fortunately someone in the Formbot Facebook group had managed to get the original STL files for all the printed parts and I was able to import those into Fusion 360 as a starting point. What you see above is what I came up with (the right cover is basically the same). The main improvements are:
- They fit on the printer! I know, low bar. I don’t have more printers to test these with but I’ll wager they’ll fit on yours.
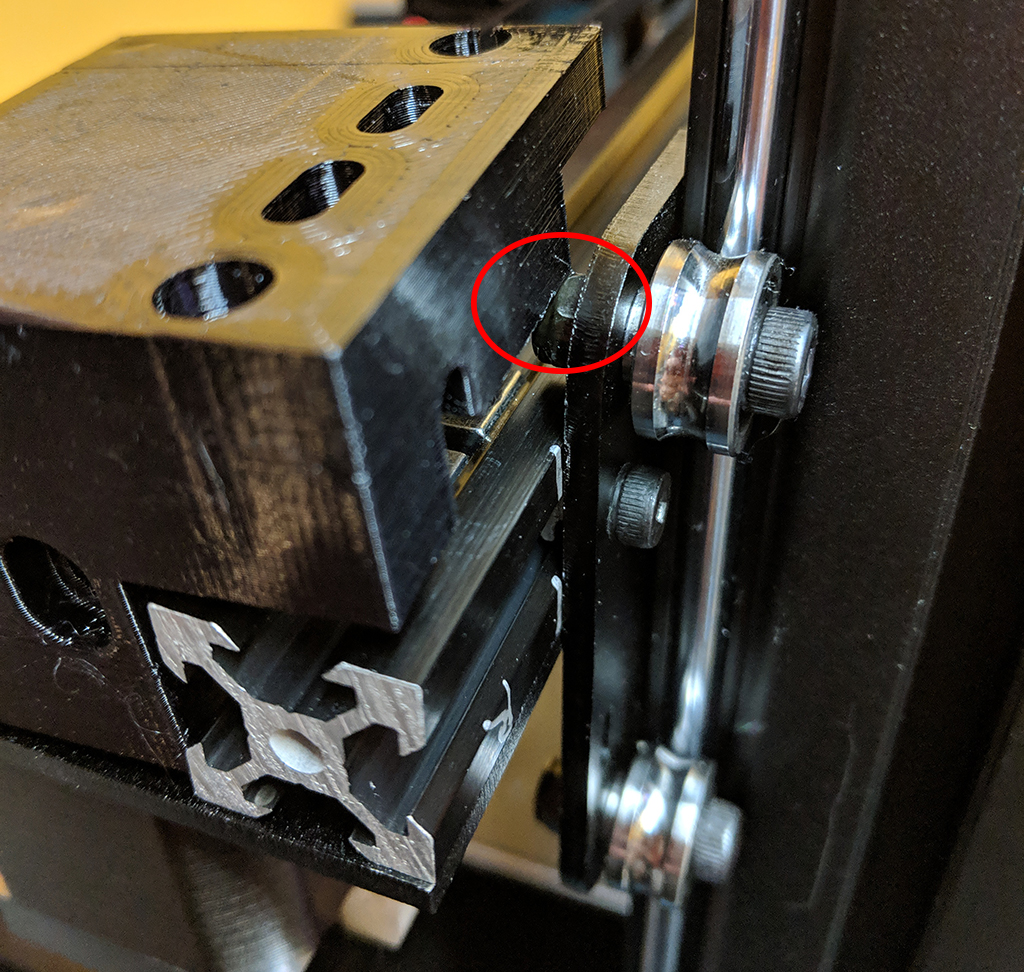
- Improved tensioning. The stock covers only provided about 2mm of travel for tensioning the belts which was not enough. Beyond that they just pinched the belt against the cover so it wouldn’t move at all. These provide an extra 4mm and stronger wall to tighten against, especially when adding a washer to the original bolt.
- You can now see the belts and pulleys. May seem trivial but these printers have had X-axis belt alignment issues which are a pain to diagnose because they only way to see the pulleys was to remove the cover and doing that releases all the tension :( No good.
So that’s the end of my fix to the upgrade kit itself. The files for the covers are available with the rest in the GitHub repo linked at the end of this post.
Now onto the really good stuff… large bore nozzles!
Volcano!
Now that the printer was all upgraded it seemed like a good time to keep going. I had previously swapped out the right extruder nozzle for a 0.8mm variant and loved the increased speed and strength it gave. However, it always did struggle a bit to extrude that much plastic. The v3.0 upgrade, however, provided a new option in that they now used an E3D compatible heat-break and heater block. That meant I could (maybe) upgrade it to a Volcano heater block!
Even better, I recently acquired a Prusa MK3 which I run with a 0.4mm nozzle, so I decided that the FormBot would go all big, all the time. 0.6mm for the left (for faster but still decent quality) and 1.2mm for the right (for function over form).
I went ahead and ordered two of the 24V/1.75mm Volcano upgrade kits (yes, this is all or nothing). While waiting for them to arrive I loaded up the previously mentioned STL files and started modifying them to work with the upgrade. The Volcano upgrade adds about 8.5mm in length to your hotend (just from the block itself) so that needed to be accounted for. I confirmed this after getting the actual upgrades but at this point I just guessed and was happy later to be correct. The components that needed to be updated were:
- Both part cooling fan shrouds
- The BL-Touch probe mount
- The “Drip Buckets”
With those modifications ready but not printed and the upgrade kits in hand, I dove head-long into it and installed the upgrade on the left extruder.
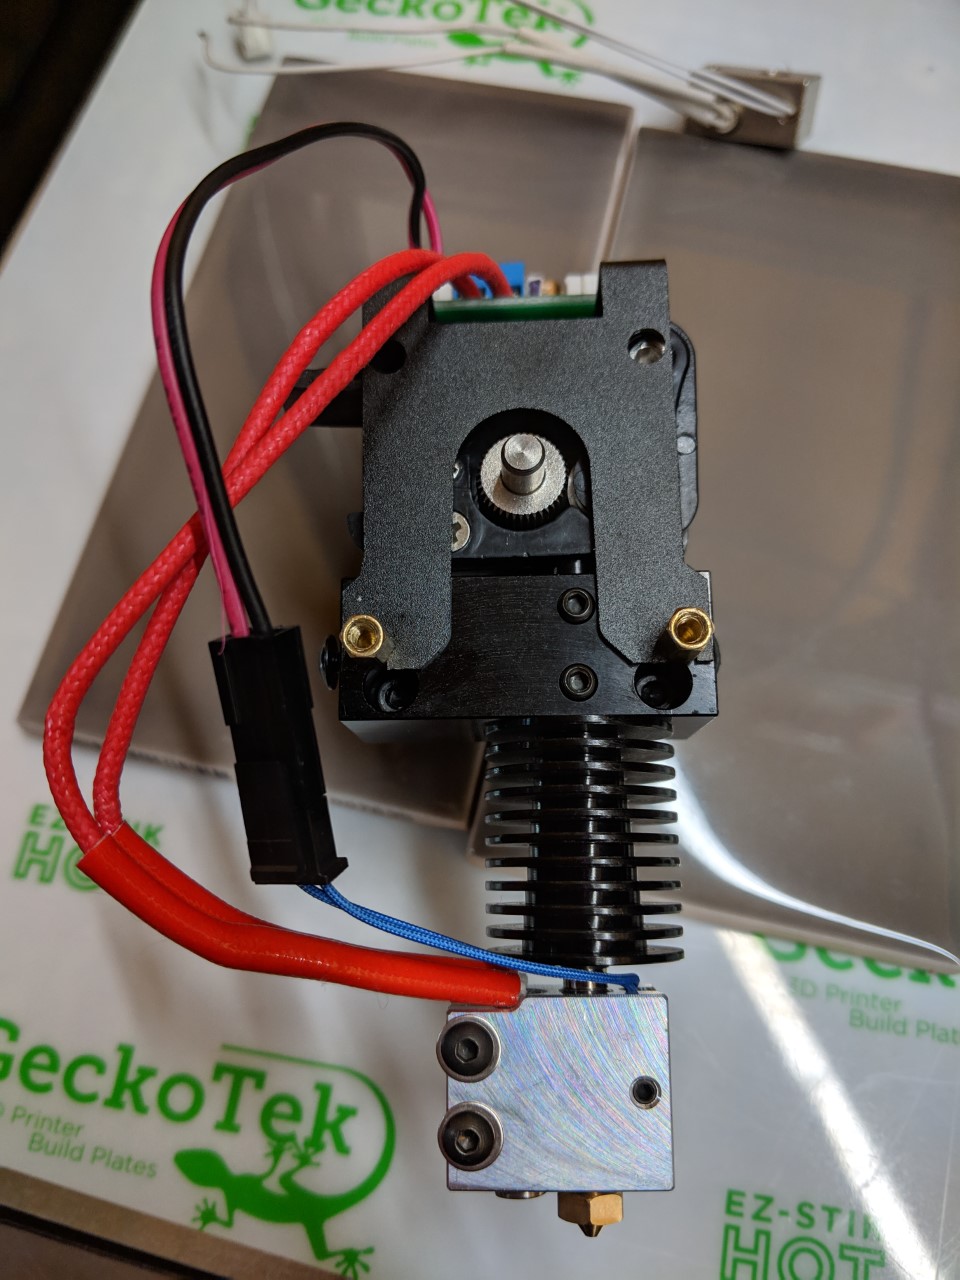
I won’t go into details as E3D already provides those for the installation and the process here is all the same. But since the Formbot has the wiring PCB on the extruder, you can just cut the heater wire short and connect it to the screw terminal. With the thermistor, you will have to connect the provided extension cable but then cut that short and add a JST-XH female connector. I did this with JST connector crimpers but you could also solder on a pre-made JST cable if you don’t have the crimpers. The polarity here doesn’t matter.

Above you can see the difference between the Volcano and stock heaters. Note that, because of how the printer is built, you need to route both cables off to the left (to the right for the other extruder) and angled towards the front. Because of the thermistor connector you won’t be able to put the original extruder covers back on, which seemed a small price to pay. The heater cable may seem like it’s a bit long but this was necessary due to the heat shielding on the cable.
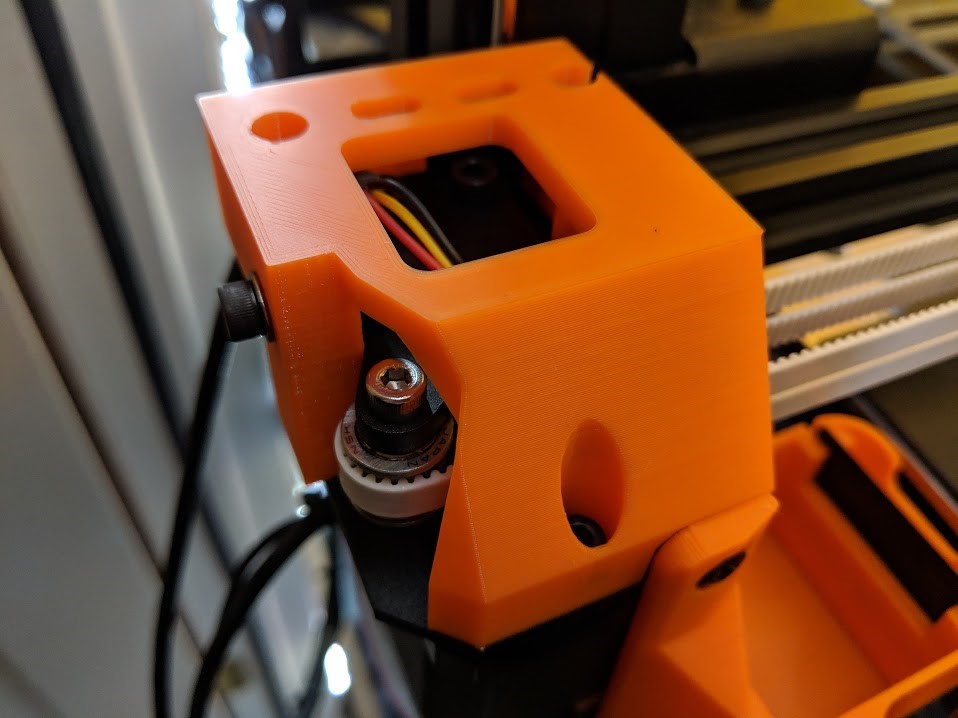
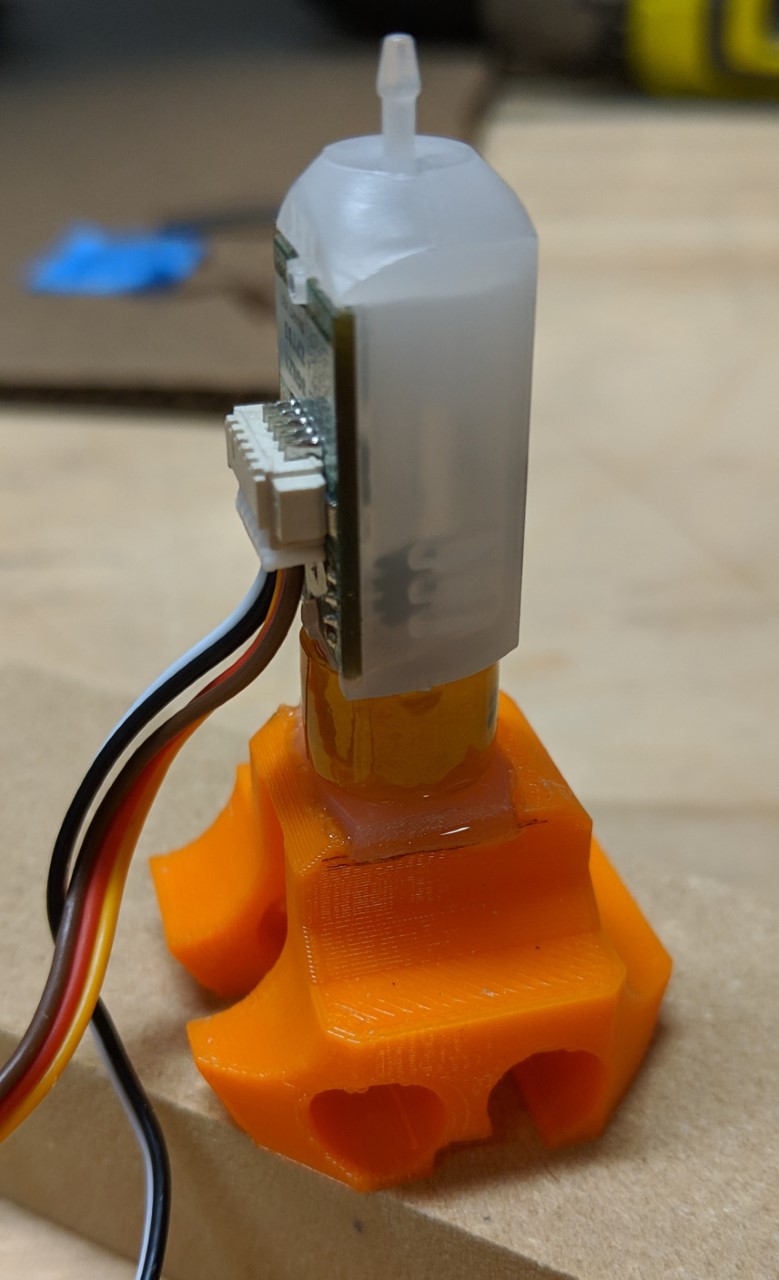
At this point things went a little wrong. When I modified the BLTouch probe mount I just added 8.5mm to it but didn’t really think about where it was. What I should have done was model the entire extruder carriage to make sure I had all the clearances correct. Instead, my newly printed mount didn’t exactly fit… as you can see in this version where I did model the entire carriage:

The square on the left is a cross-sectional view of the 2020 extrusion which makes up the X-axis rail and the white rectangle on the right is the belt. The dimensions of the mount were dictated by the dimensions of BLTouch mounting tabs. But when moved down 8.5mm I could find no way to make it fit. I even tried rotating the probe every which way I could but to no avail. As you can see, the mount (red) and the probe mount tabs run into both the 2020 and the belt. This led to about a week of pondering the problem and I came up with the following options:
- Replace the BLTouch with a different, smaller probe type like capacitive or inductive. This however, would require a firmware change.
- Move the probe elsewhere. Unfortunately the only place it could go and not run into another part of the printer was in front of the extruder and its fan. This was non-ideal and still required a firmware change.
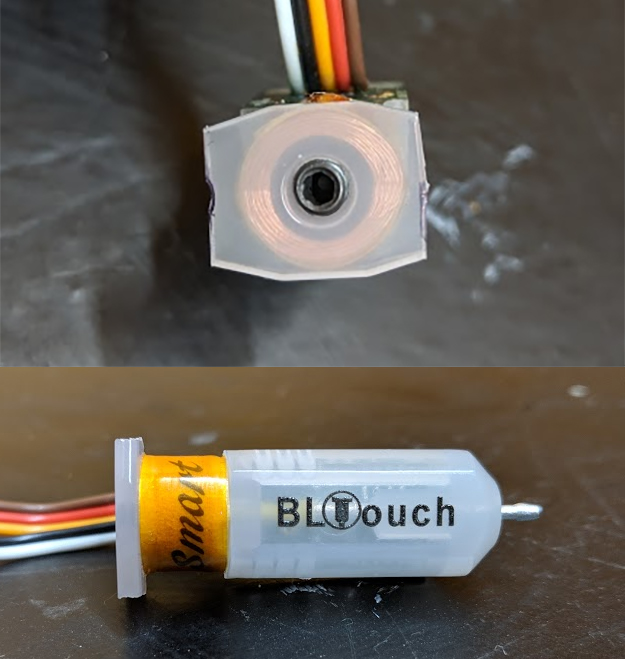
- Physically modify the probe my cutting off the tabs and gluing it to the mount.
Oddly, it was this last option that initially gave me the most pause. I saw firmware changes as reversible but was not happy with the idea of irreversibly modifying the probe itself. But in the end, this one modification really was the simplest path to getting me back on track.
The modification to the probe is simple and quick. But please note: if you decide to go back, you will need a new BLTouch probe!!
Simply cut off (I just used flush cut snips) the ends of the mount tabs, right at the inner edge of each of the screw holes. As shown below:
The new mount, with its smaller probe mount profile, can now easily fit between the X-axis rail and the belts. As seen the the picture below, I modeled in some ridges that will provide extra surface area for the epoxy affixing the probe to the mount.

The probe can then be attached using quick curing epoxy. DO NOT use super glue! Epoxy is required for the necessary compressive and shear strength.
The new mount also includes a hole in the top for access to the grub screw which allows changing out the pin, should you ever need it. However, you need to protect it from the epoxy. I did this by taking a small length of tape and rolling it into a cylinder (sticky side out) and inserting it into that hole, touching the top of the probe. This will prevent the epoxy from covering that grub screw.
Be sure to mount the probe with the wires facing the cut out on one side as shown above.
Once the epoxy has had time to cure, it can be reinstalled on the carriage just as the previous mount was. However, I was unable to make the built-in probe protector (it keeps strands of plastic from clogging the probe pin) work with the new design. Instead, I highly recommend printing and installing this stand-alone version on Thingiverse.
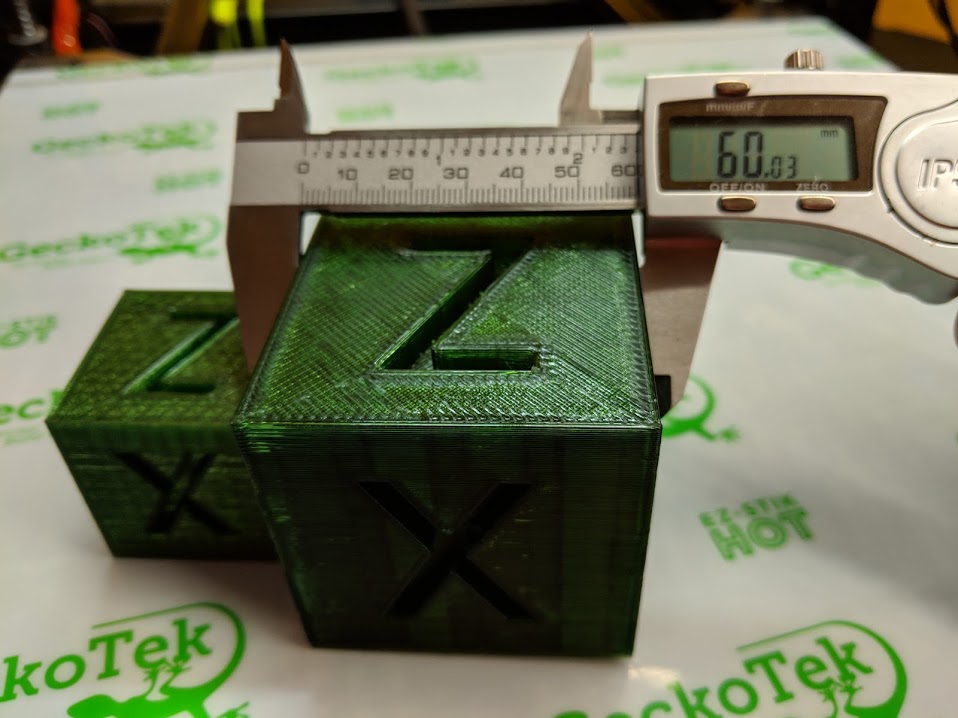
With that done, the printer itself shouldn’t even know there’s anything different! The probe is in the exact same X/Y position as before and it compensates for the 8.5mm height difference. But before installing the upgrade on the right, I wanted to test everything. I had installed a 0.6mm nozzle in the left which shouldn’t be too different from the original 0.4mm so I just copied my original slicer profiles and changed the nozzle diameter. As you can see (the block should be 60mm cubed), it worked great!
So with that working, installing the upgrade on the right was a similar affair, just without needing to also modify the touch probe this time and the wires being routed to the right (no idea why the heater wires were yellow for this one).

At this point I should note that I of course also had to install new part cooling fan shrouds as well as updated drip/wipe buckets. Nothing really fancy to these, they are just 8.5mm taller than stock and I replaced the bucket thumb screws with a lower profile M4 screw. This last part is of importance and the reason for stating that the heater wires need to be routed towards the front of the extruder. It is so that the wires clear the mounting arm of the bucket and also don’t run into the X-axis motors. See below:
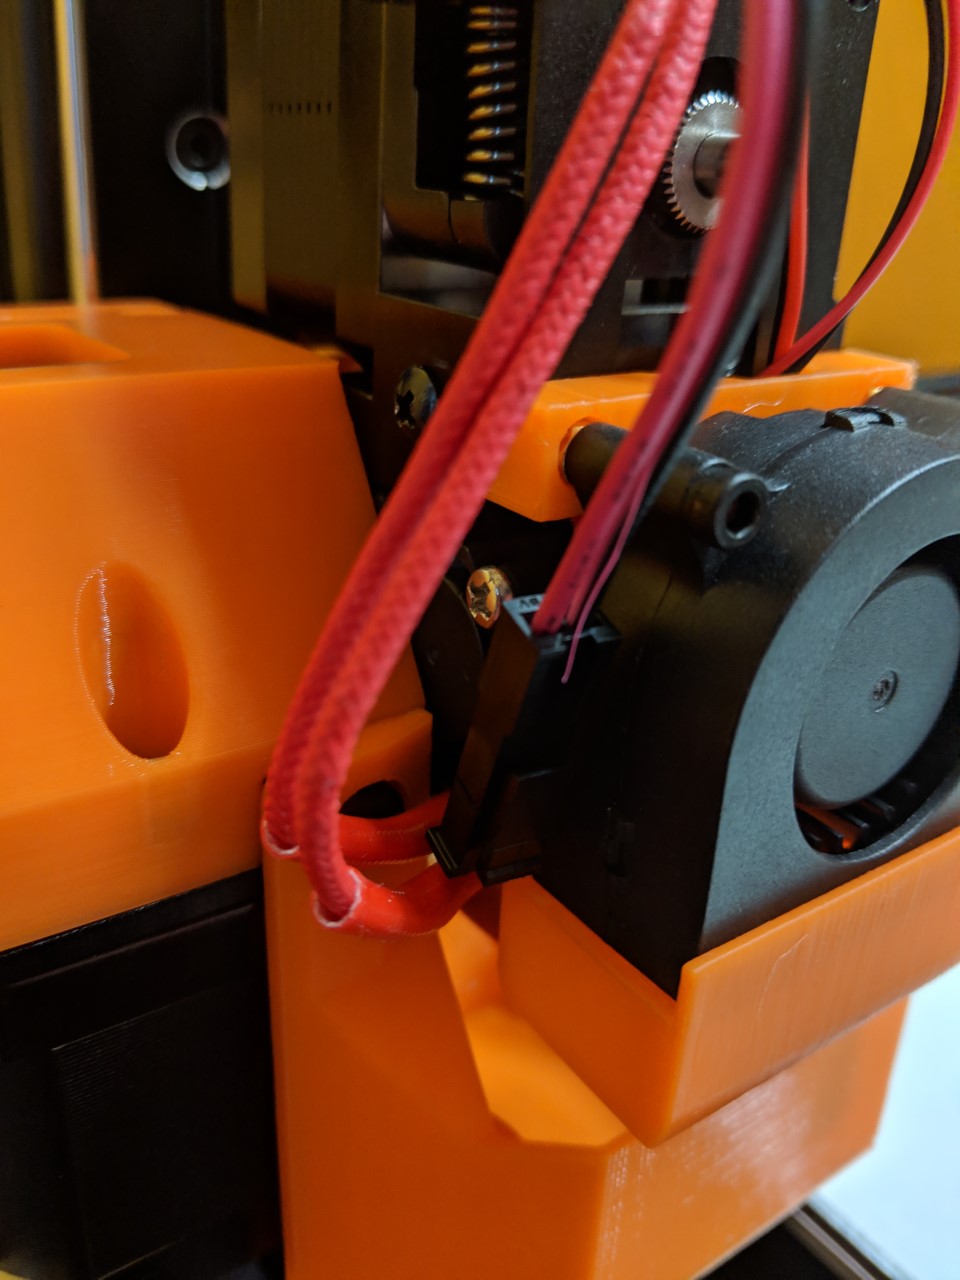
It’s close, but it works :)
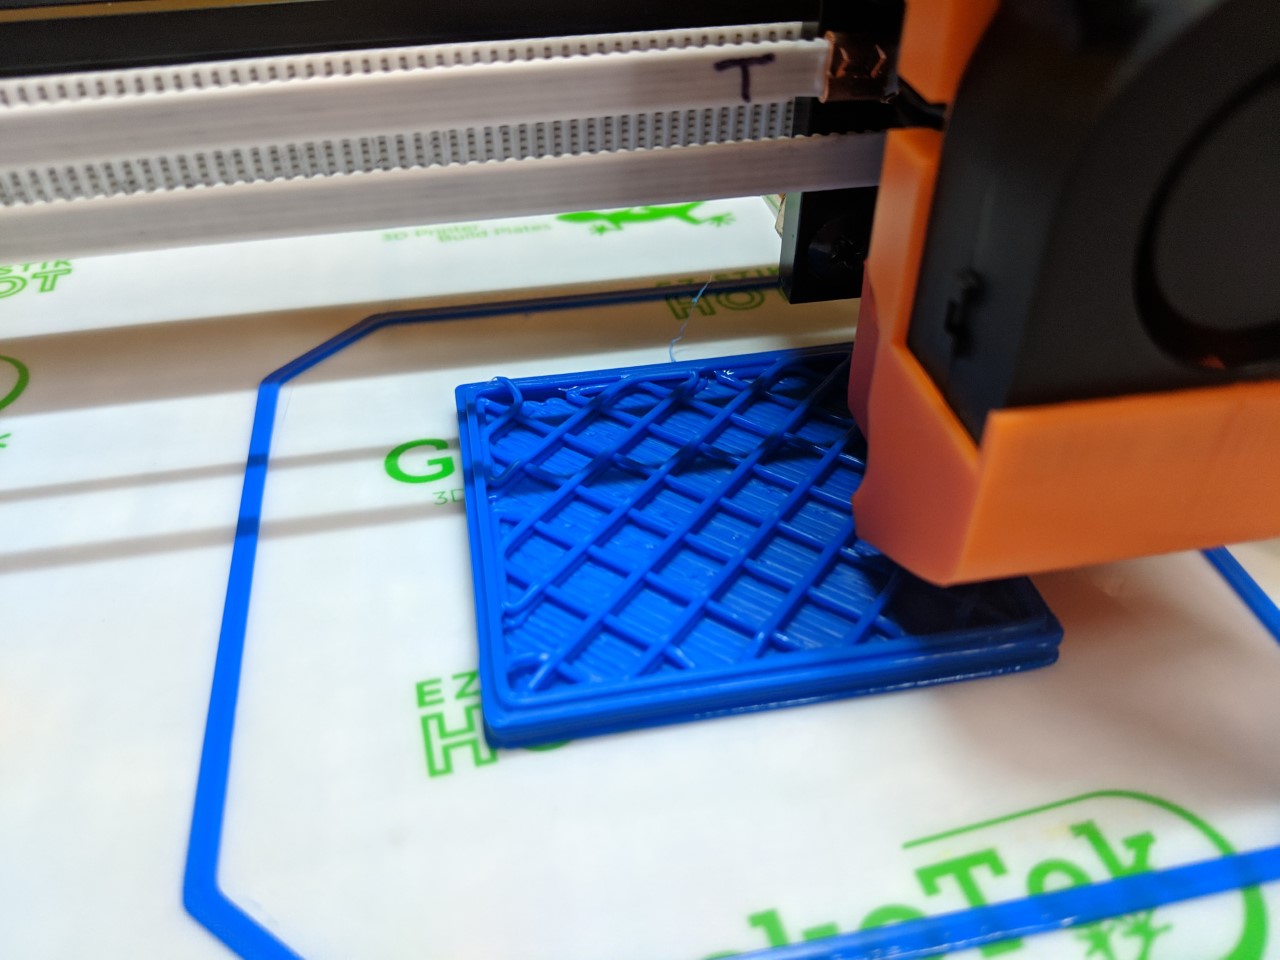
Unlike the 0.6mm nozzle, the 1.2mm version took a bit more tweaking in the profiles to get everything working. But just check out those ridiculously fat extrusions!
As for the hardware, that’s it! With the exception of the BLTouch probe it is a drop in replacement. All the parts were printed on my Prusa (since the Formbot was in pieces) and should be printed as follows:
- Motor covers: 0.2mm layers / 30% infill
- BLTouch mount: 0.2mm layers / 25% infill
- Fan shrouds: 0.2mm layers / 25% infill
- Buckets: 0.2mm layers / 15% infill
All of the above files can be found in my T-Rex 3.0 Mods Repo.
Slicer Profiles
While the Formbot T-Rex 3.0 is entirely capable of fancy things like dual color/material printing and the likes, you might have guessed by my nozzle size choices that I don’t really use that. Ever since I’ve had it I basically use it as two printers in one. As such, the only slicer profiles I have to offer use each extruder completely independently of the other, but these may work as a good starting point for a profile that uses both at the same time.
Also, I use Simplify3D (for this printer anyways) so that’s all I’ve got, but they can serve as a good reference for other slicers.
For the left 0.6mm nozzle it is basically my old 0.4mm profile as noted before. For the right 1.2mm nozzle I had to change several things and am still playing around. But some items of note:
- Because I didn’t modify the firmware it still thinks that it has 8.5mm more Z travel that it really does!! There are a couple options for avoiding any problems.
- In your slicer settings, knock 10mm off the Z-height in your profile. I’ve already done this in the provided S3D profiles.
- In OctoPrint decrease the Z-height in the printer profile. Less fool-proof but recent versions will at least warn you if the model is too big.
- Go hot and go slow. Even with the Volcano heater block you are still pumping out 9 times as much plastic as with a 0.4mm nozzle. Bump the temperature 10-20 °C and start out around 35mm/s. But remember, even if that’s half as fast as your small nozzle, it’s still printing 4.5 times as much plastic per second.
- Retraction and Coast settings are primarily for “ooze control” which is caused by backpressure in the nozzle. With one so large, however, that’s not really a problem. I turned them off.
- Many slicers will slow down for the outer perimeters. Increase this speed. If you are already printing at 35mm/s you could end up burning the filament when it slows to 10mm/s or similar. No need to slow down even more.
- Use denser infill than you think you need. It will be terrible at any sort of bridging and with sparse infill there’s nowhere for solid layers to stick to.
You can download the profiles here:
Still have tweaking to be done, of course, but I’m happy with what I’ve been able to do so far:
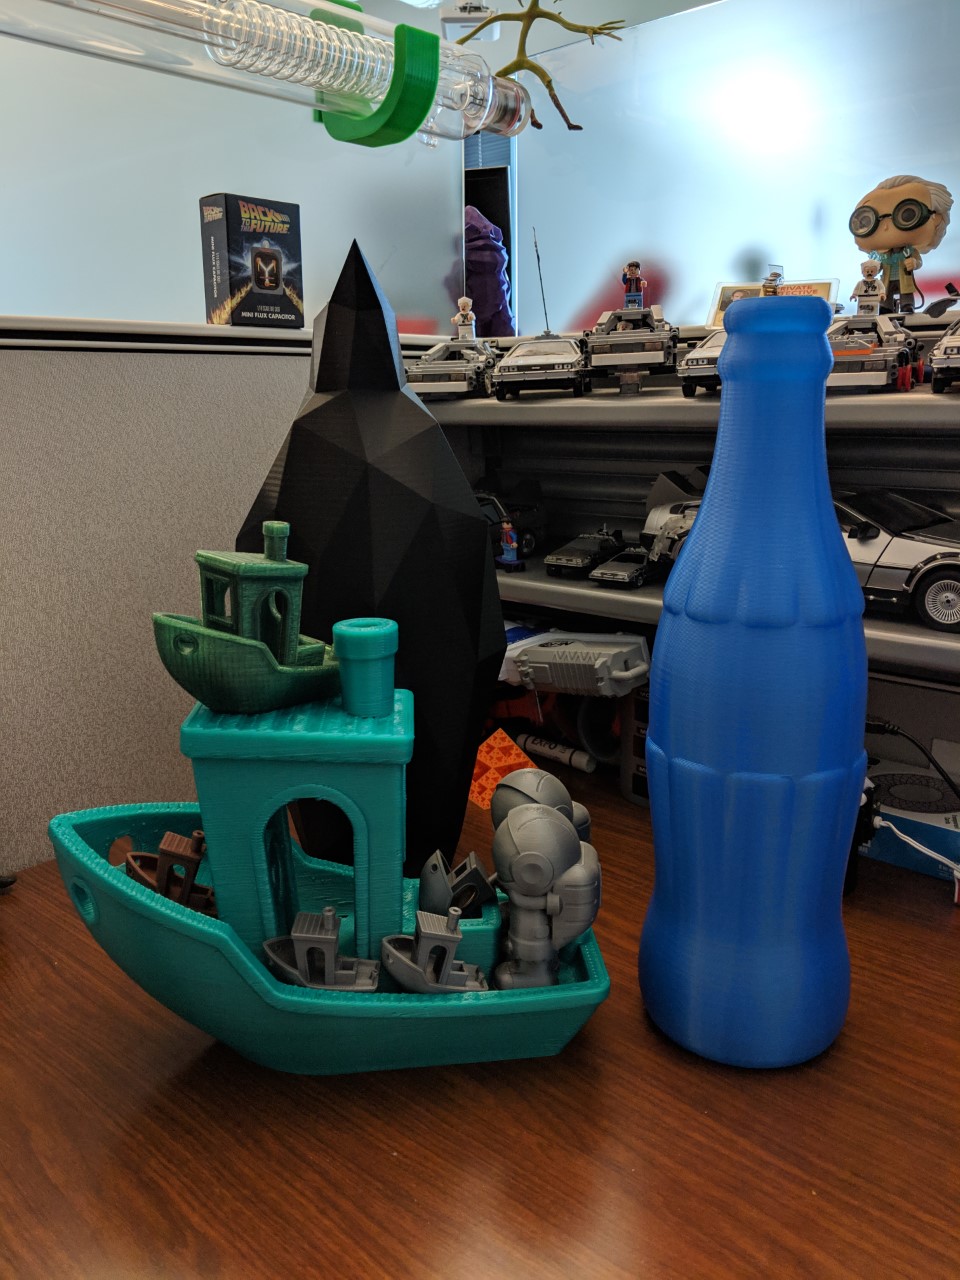
The Soda bottle is printed with the 1.2mm nozzle, 0.6mm layers, and in vase mode, requiring only ~3 hours to print.
The Benchy is scaled to 500% and printed with the 1.2mm nozzle, 0.8mm layers, 8% infill and took 7.5 hours to print. It’s really rough, but I love it! Printed with a 0.4mm nozzle it would’ve taken over two days! Oh, and it used an entire roll of filament :P
Bonus Round!
While I was reworking the drip buckets I had an idea. [Sam] had found this great Logitech C270 webcam mount for the Prusa MK3 which I love because it mounts the camera in line with the nozzle so you can easily inspect the current layer.
I realized that the drip bucket would be a perfect place to mount the same camera (and I had already bought two of them) so I incorporated a similar mount so that I could get the same view.
Like the rest of the files, this one can also be downloaded from my T-Rex 3.0 Mods Repo.
Because of the height of the printer, I highly recommend zip-typing the camera USB cable to the X-axis motor cable on that size. That should keep everything in-line and tangle free.
That’s all for now. I hope this is helpful to any of the other Formbot owners out there!