LED Coffee Table - At Long Last
It’s always a happy day when a project makes it from the “In Progress” bucket to the “Done” bucket. This one had been in the former for quite some time. But now that it’s complete, I thought it fitting to show it off and share some of the steps along the way.
This project actually started a while back, around when we were working on our giant LED display, Colossus. I love how the foam core dividers work for that project, and thought it would be awesome to replicate that effect in a slightly smaller form factor, namely a coffee table. Also, my existing Ikea coffee table had started to fall apart, so a replacement was in order.
Now given my nature, I wanted to play with the awesome blinky lights part of this project first. So I mocked up a version of the 8x16 display part of the table using some plywood and 3⁄4” x 6” pine board. I also wanted to use this as a way to verify that running the Raspberry Pi and the WS2812 LEDs off the same battery pack would provide at least a few hours of runtime. Everything seemed to be working OK at this point…
Aaaand now we wait a few months due to other projects, Real Life™, etc…
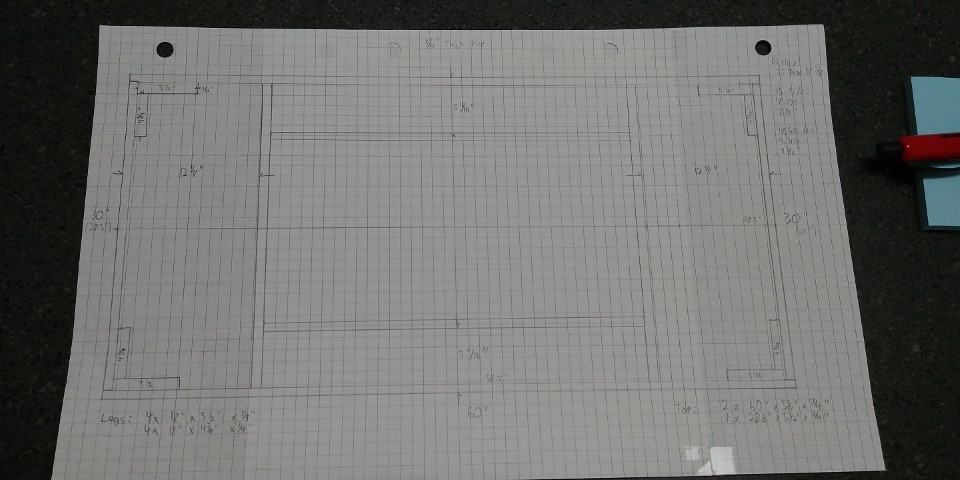
Oh hey we’re back! So a few weeks ago as of this writing, after a successful SparkCON 2017, I decided it was time to finally finish this project. I had ordered the 30” x 60” piece of tempered glass that would be to top of the table, and that giant (heavy!) thing was siting in my workshop staring at me. I dusted off the plans I had drawn up a while back to essentially mimic the demo box above, but with added bits to turn it into a full-sized coffee table with legs and such.
The table top would be made out of the same 3⁄4” x 6” pine board, which actually was pretty good quality right from Home Depot. I went with ‘Select Pine Board’, which is a bit more expensive than common board, but the quality is generally better, both in terms of the wood itself and the cuts during the production process. So it was pretty much good to go from the store, and just needed to be cut to length when I got it home.
The exact dimensions differ slightly from my original plans. There were some errors made between drawing up those plans and final assembly. This was possibly due to using the same piece of plywood with the holes drilled in it for the final table as was used in the demo box. Regardless, everything came together alright. Next time I build one of these, I’ll remember to counter-sink the drill holes before screwing everything together ;) The display board itself is held in place using shelf pins. Pro Tip: there’s about an eighth of an inch of play to the shelf in the up/down direction depending on how you rotate the pins. This actually helped save me some time when I realized I had cut some of the foam dividers a bit too tall >_<
The diffuser is a piece of 45% white acrylic, which works better than I had expected, even during daytime when the room is decently lit. To save on battery life, I’m only running the LEDs at about half power, and even then, the display looks great. Once everything had been verified to work, the legs built and holes for them drilled in the table top and it was about time for final assembly.
The electronics changed slightly from the test version to the final. I’m now driving the display with a Pi Zero W, which makes sense, given the lower power draw compared with the regular Pi, and the built in wireless capabilities. I’m also using our PiPixel HAT to simplify the connection and powering of the LEDs. The secondary power connection on the longer lead connects to the opposite end of the 128-LED string. This is to mitigate the voltage drop that would be seen if I were only powering the strip from the start of the chain. I’ve since installed a switch that allows the Pi and LEDs to be easily disconnected from the battery pack for charging. As for the software, our Python-based library BiblioPixel is used, of course :)
And that’s pretty much it! I’m glad that I finally had the motivation to finish this project, as I’m quite pleased with how it turned out. There’s a few things I would do differently in terms of how the construction took place, but those are more in the realm of “measure twice, cut once” and “plan before you do.” In terms of cost? Ahh, well let’s not include time spent in that, shall we? Hehe. From a materials standpoint, I’d say about $500 all said and done for electronics and wood/plastic/glass. The glass sheet was the biggest ticket item, coming in around $200US from Amazon. The plastic diffuser was custom cut from TAP Plastics for about $50. I already had the LEDs and the Pi/Battery, but I’m ball-parking there cost in there as well. So yeah, expensive for a coffee table, for sure, but I’m really happy with the results, and I can point to it and say “I made that” :)
-Dan


